How I self-host my git projects with Forgejo
 Nils Norman Haukås
Here’s how I currently self-host my git projects, specifically how I’ve setup my network, backups and deployments. A lot of thought has gone into this, and I hope this writeup will save some time and toil for others.
This is a companion article, to another post where I outlined my reasons for divesting from Github. While that post covered my motivations, this post is a practical walkthrough of my setup for hosting my git projects.
My overarching goals for this setup are:
- Aim to learn non-hype, longlived concepts and technologies, such as Linux system administration, IPv6 networking, ansible, restic, openwrt and shell scripting.
- Minimize technical debt and maintenance costs, and support future growth and experimentation.
- Use affordable, power-efficient hardware.
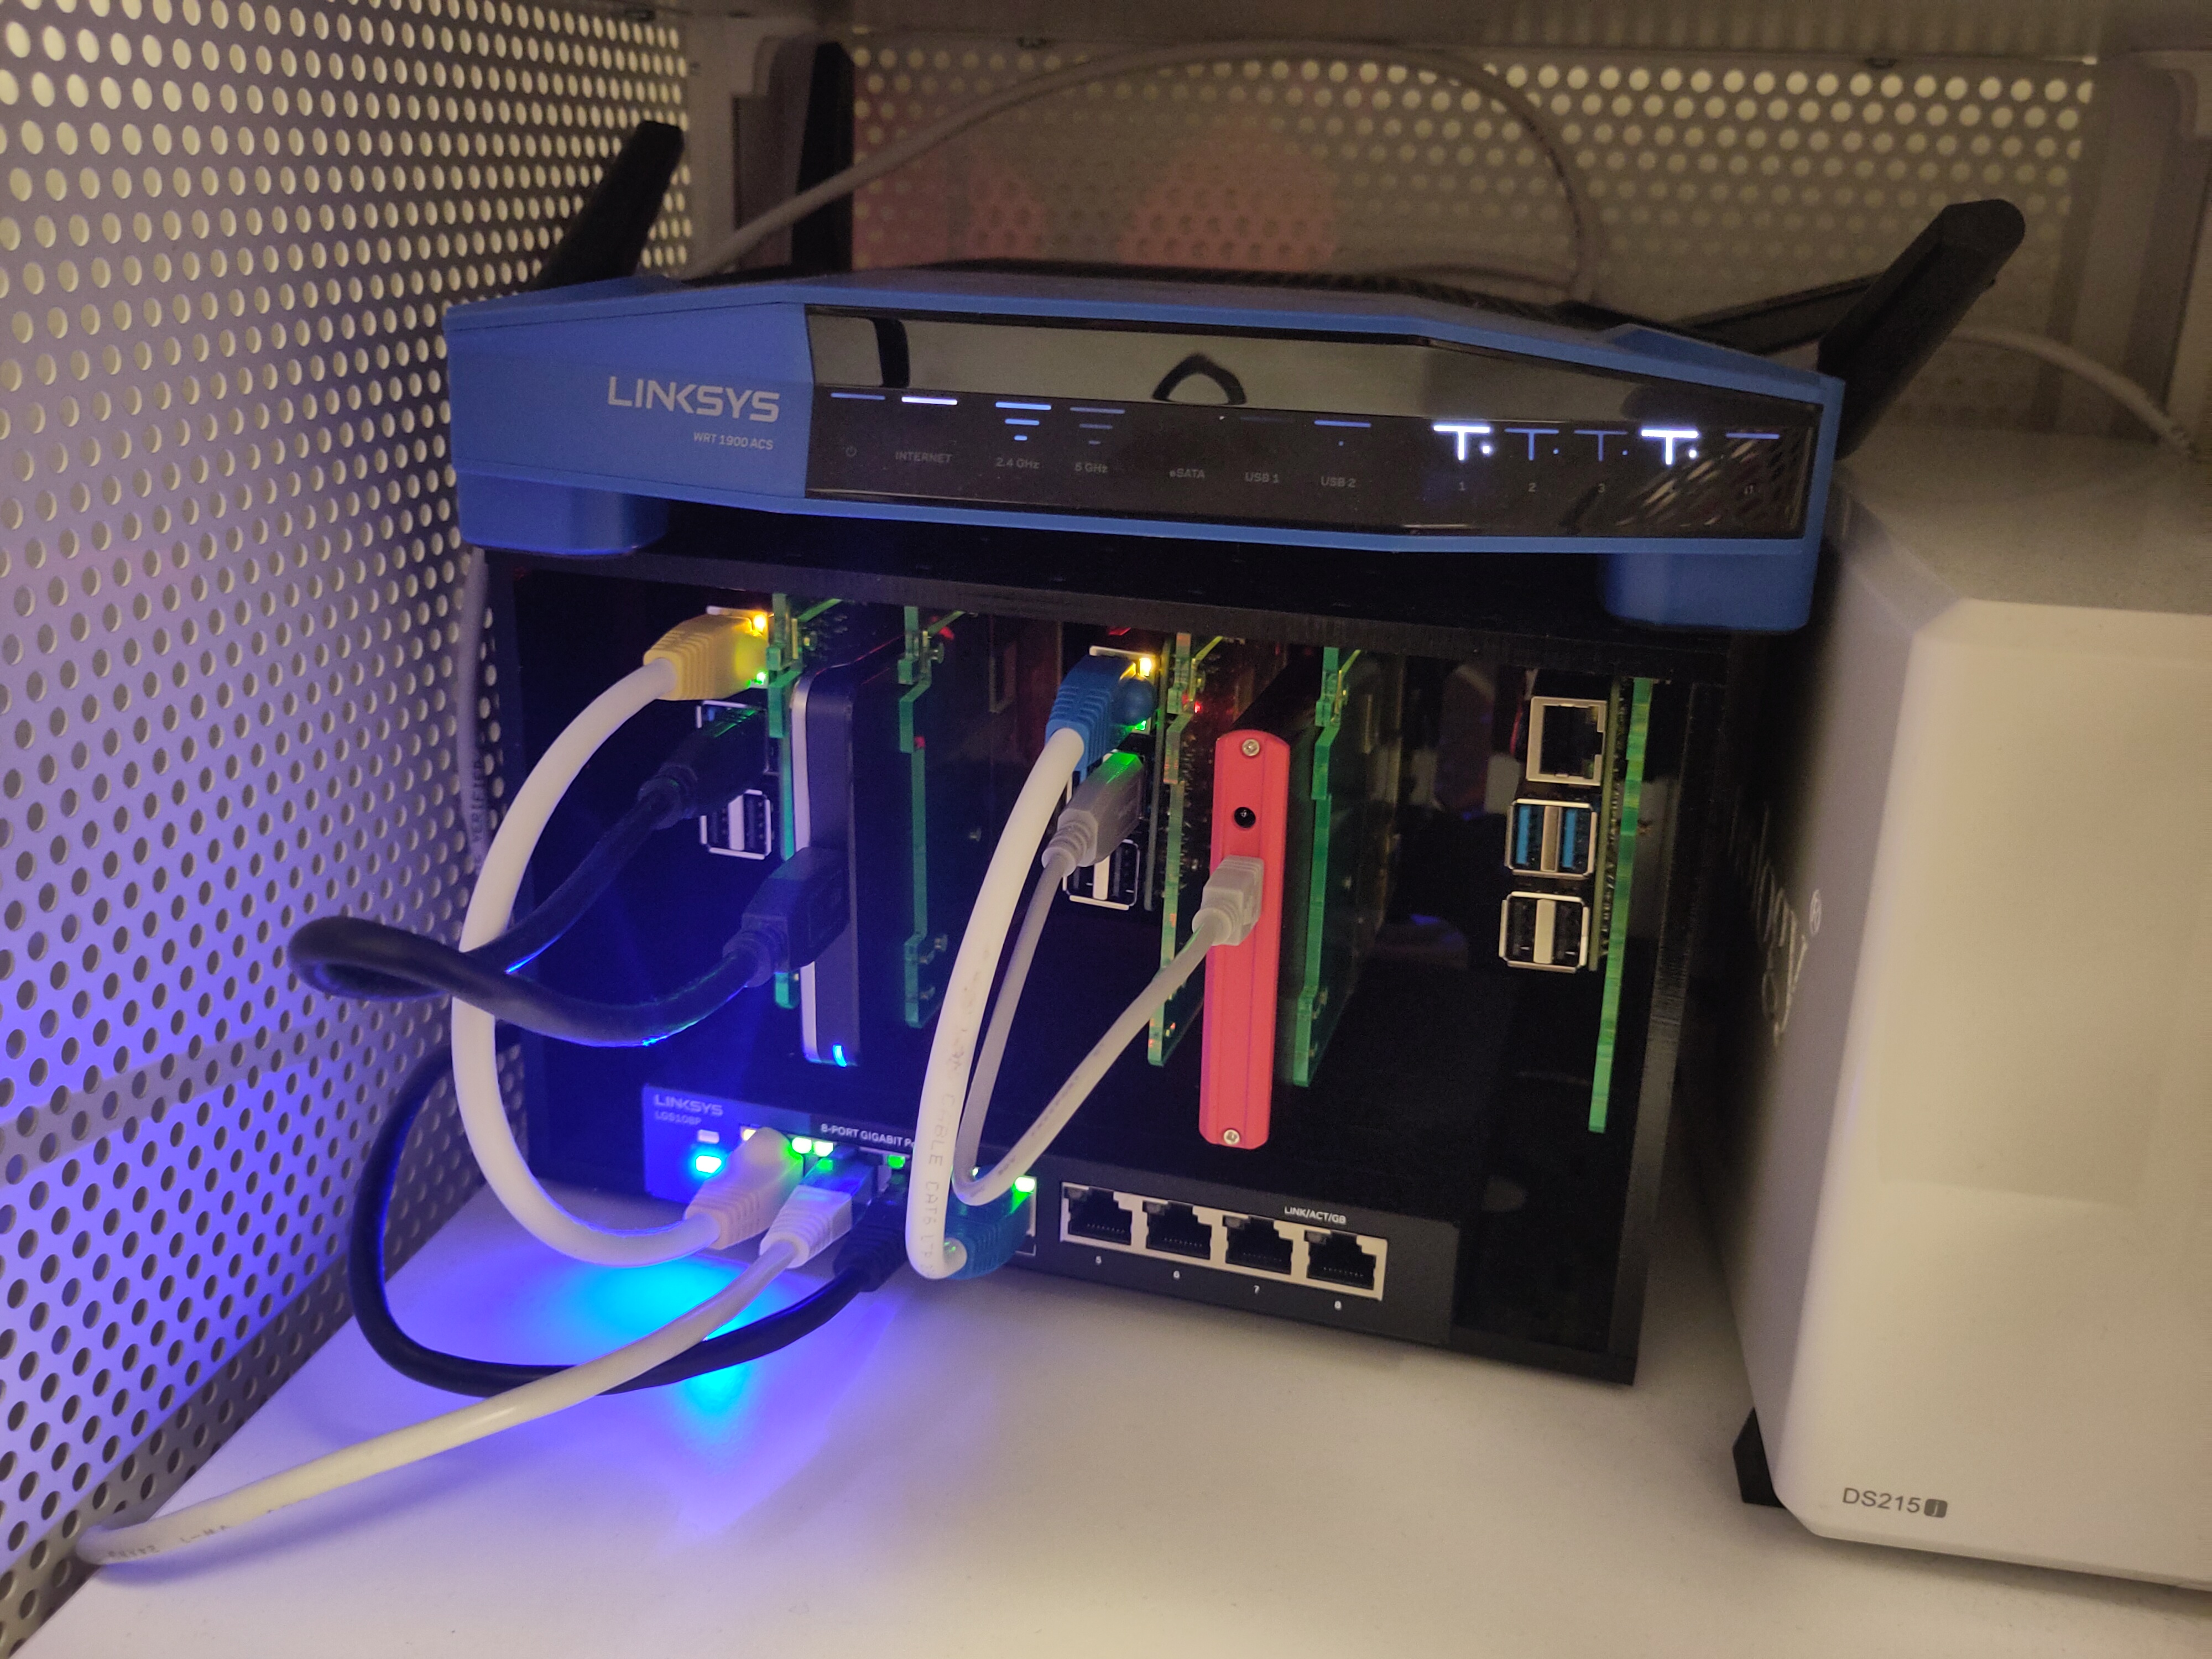
A closeup of my homelab, featuring a couple of Raspberry Pi 4’s, where one serves my git projects from a 500gb SSD hard drive, connected to a Linksys switch (LGS108P) supplying power over ethernet, which in turn is connected to a Linksys router (WRT1900AC). The third RPi is a spare for now. All the RPis sit snugly mounted inside an 8-Slot Cloudlet Cluster Case.
My Network topology #
Quick terminology primer:
- WAN: Wide Area Network, which can be understood as the rest of the network you’re connected to. Or even simpler, the world wide web.
- DMZ: Demilitarized zone is a commonly used term for parts of the network where traffic originating from the WAN is allowed in.
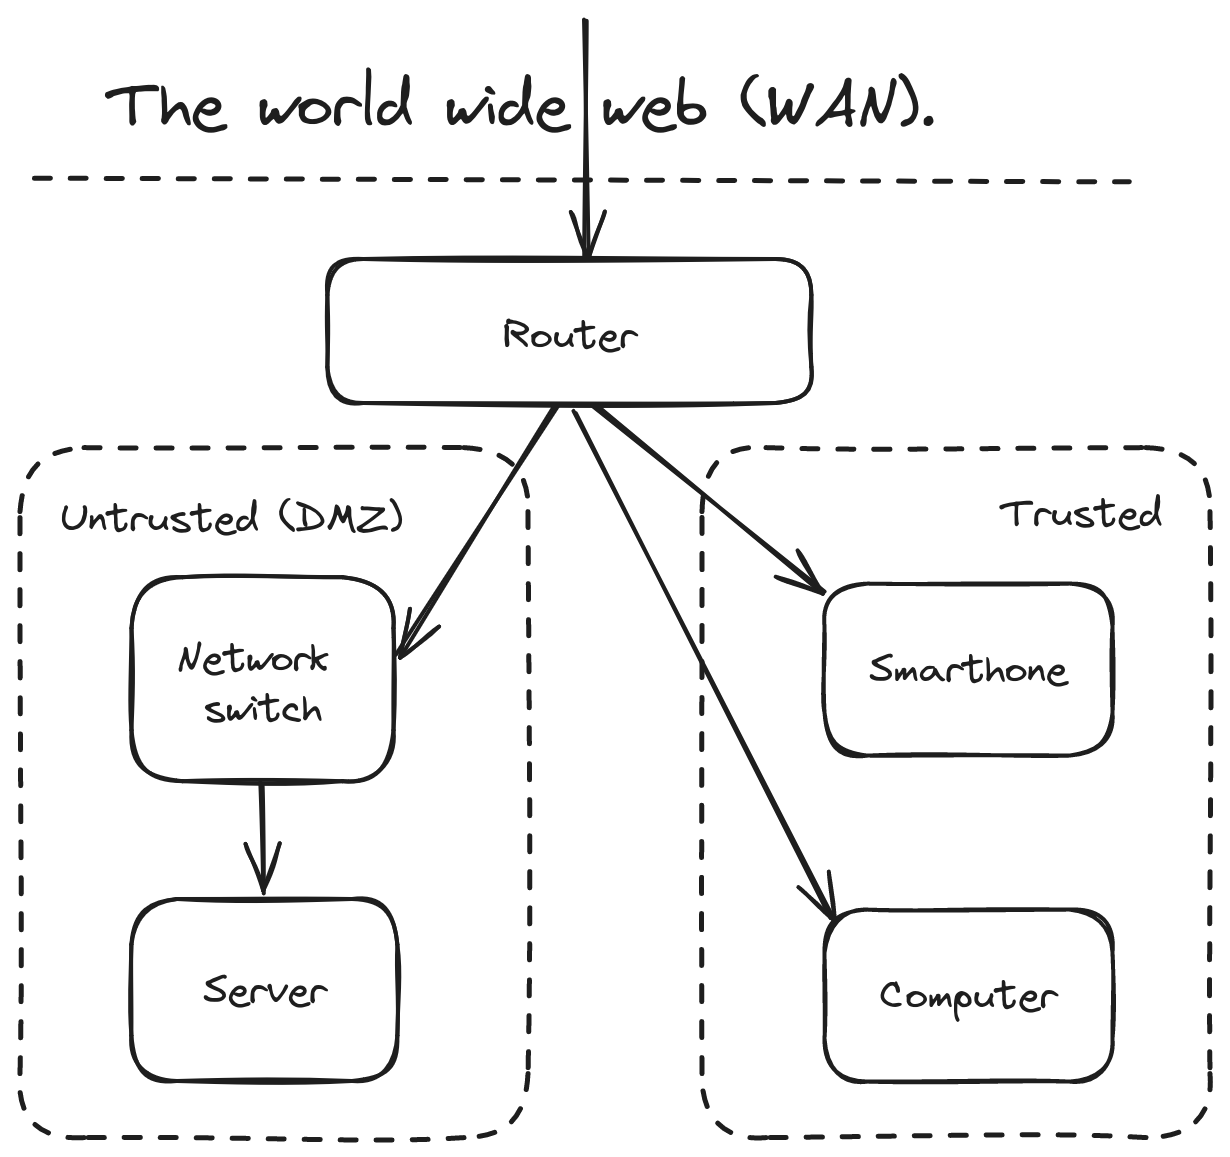
Any incoming network requests first arrive at my router, which is a Linksys WRT1900AC. I bought this router used for around 50USD, and then installed OpenWRT on it.
Thanks to OpenWRT, I can do a lot of nifty things like sub-dividing the network using firewall zones. Presently I have two main zones.
Untrusted zone (DMZ) #
Outside network requests are allowed to hit anything running here. But any devices within the DMZ is not allowed to initiate requests to any other zones, except the WAN.
Using OpenWRT I configured a router ethernet port to be within the DMZ, and then connected it to a network switch. This means that anything I connect to the switch in turn, will be automatically be placed within the DMZ without requiring any software configuration.
Caveats:
- You must implement a zero-trust security model for all devices in the DMZ. Don’t trust devices simply because they have the right IP or MAC address. Network traffic should be encrypted by default.
- Following the previous point, any devices in the DMZ will need to be individually hardened. While OpenWRT comes with a lot of default rules to prevent network shenanigans, the onus is on you to ensure that all devices within the DMZ have their own firewalls configured.
Trusted zone #
In contrast to the DMZ, this is “everything else” about the router. Any devices connected to the router’s WI-FI or its remaining ethernet ports automatically end up in the trusted zone.
Devices in the trusted zone are allowed to initiate conversations with devices in the DMZ, but the reverse is not allowed. This is quickly confirmed by doing a ssh login into a server in the DMZ, and then trying to ping or communicate with any IPs in the trusted zone, it won’t work.
All my DMZ devices receive global IPv6 addresses #
Previously I’ve written about how and why I setup IPv6 delegation (in Norwegian). With IPv6 delegation any devices within my DMZ receive a globally routable IPv6 address.
I can’t overstate how much global IPv6 addresses simplified my setup. It means I can totally skip the issue of network-area translation (NAT), and skip wrestling with dnsmasq on the router to make it resolve domain names against internal IPv4 addresses.
Instead I can take any global IPv6 address in the DMZ, stick it behind a domain name, and have it resolve swimmingly inside and outside of the network. And I don’t need to touch dnsmasq on the router.
Update: After I wrote the above, a friend noticed that code.on.nilsnh.no did not resolve for them, I then realized that I would need to either display a sensible error page explaining the lack of IPv4 support, or just make it work. I did the latter, by setting up some port forwards on my router. Regardless, IPv6 remains my default goto network technology for the reasons listed above.
My backup strategy #
I aim to follow the rule of thumb called the 3-2-1 backup strategy, which recommends having three backups, where two of them are local media (devices), and the third is off-site.
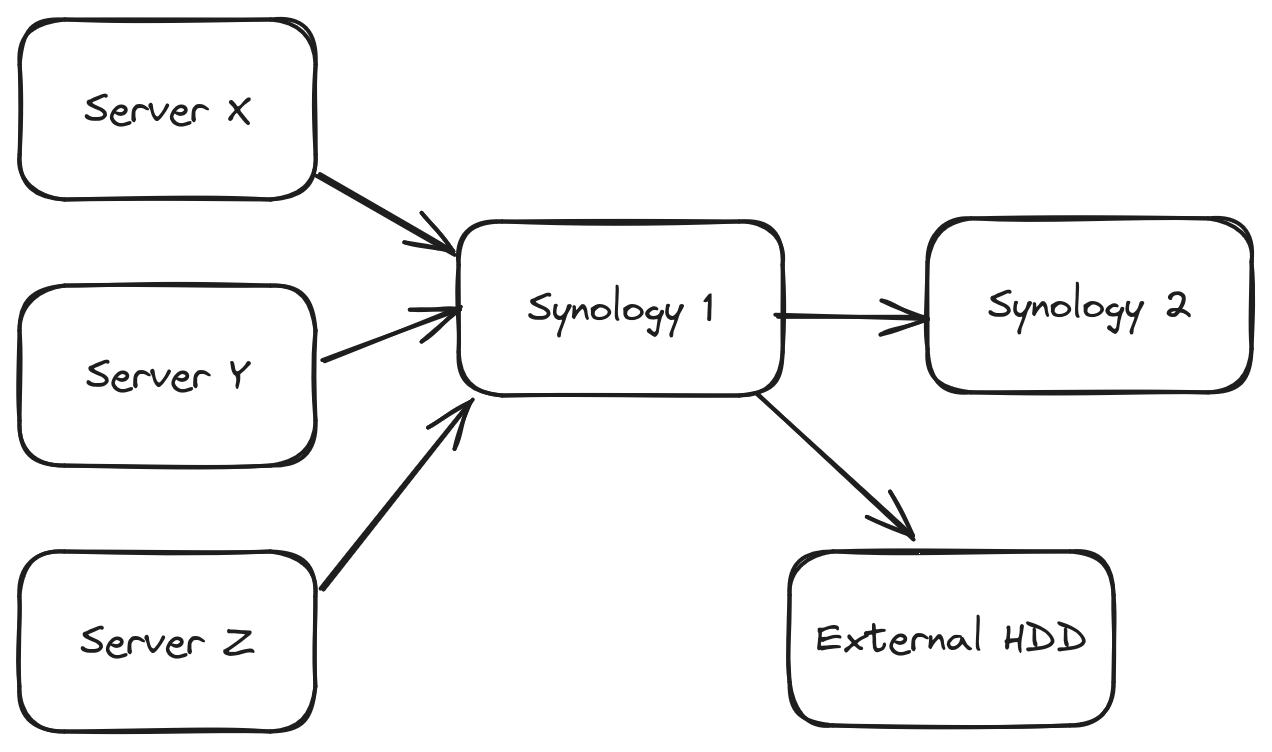
When setting up a new server I first create a new user on the Synology 1, which is a Synology DS220+ network attached storage (NAS) device. This new user is granted access to only sftp and its own backup-folder/ with a sensible max disk space quota. Since Synology 1 is in the DMZ I don’t enable ssh support. However, in the user’s home directory I create a .ssh/ folder with a authorized_keys file that includes a public key from the new server and my laptop. I make sure that both .ssh and authorized_keys is owned by the new user. Afterwards I run sftp someuser@exampleserver.com from my laptop and my new server, to verify that I can access my Synology using my public keys.
On the new server I install Restic, which is a command-line backup tool. It supports many protocols. In our case we’ll initialize a repository backup target on the Synology using sftp. Thereafter I configure a recurring backup job, that’s also setup to prune outdated backups, verify backup validity and notify me by email if anything fails to complete.
With restic it’s really easy to inspect and load any given backup snapshot. Here’s an example of a backup-restoration script, which can be called without supplying any passwords, because it relies on ssh public key authentication, and it relies on loading the restic repository password from the encrypted Ansible Vault file (more on Ansible later).
On the Synology 1 I’ve setup a Hyper Backup job that periodically backups to a separate Synology 2 box. Hyper Backup also runs periodic backup checks, and the Synology itself also runs periodic disk health checks. Additionally, I also use Hyper Backup to perform backups to an external disk. In sum, this backup setup adheres 3-2-1 backup rule of thumb.
Now let’s do a bit of threat modeling, and ask ourselves what can go wrong with this setup? A server can get compromised where they gain access to the root user. This’ll let an attacker flood the backup until it hits the backup folder’s max disk quota, or they can download and destroy the backups on Synology 1. However, we would still have versioned backups on Synology 2 and the external hdd to restore from. And because we have separate users and backup folders for each machine, we mitigate the chance for attackers to move laterally and reach all the other machines’ backups.
For now I think this backup design strikes a decent balance between usability and security. Do send me an email if you have ideas on how it can be made simpler and more secure.
Why I picked Forgejo for self-hosting my git projects #
After weighing a lot of alternatives I ended up picking Forgejo because it’s lightweight, and lives under the umbrella of the non-profit organization Codeberg e.V.. Incidentally, Forgejo was forked from Gitea after it became clear that the Gitea’s stewards wanted to take a for-profit route and not democratise ownership of Gitea’s intellectual property (more about it here). And Gitea in turn was forked from Gogs back in the day.
There are certainly simpler ways to share code online. Like, you can take a server with SSH access and put bare git repo on it. This won’t give you large file support (LFS), but that’s not a problem unless you want to include large files in your code projects. And if you want to provide users with a way to browse your projects, you can install a lightweight web-ui such as cgit.
Forgejo is a more complicated piece of software and built to support a ton of users. However, I think that just gives me room to grow by configuring CI/CD or integrating with external web services. And I’m heartened by how Forgejo’s community has been governing itself thus far.
Picking open source projects to build on can be a bit of a hit or miss. Sometimes it’s good to bet on a VC-backed for-profit open source project, because it has money to burn in order to hire top-talent and crank out features like there’s no tomorrow. But for me, these days, I’d rather go for some community-driven, slow-cooked, non-profit project like Forgejo.
My deployment setup #
There are a ton of software solutions for how to deploy software to servers. For me I’ve really come to like Ansible, because it only requires access to python and ssh. You can start simple, and truly grow it to fit large deployments.
In short, ansible let’s you create playbooks which are files that act as configuration-as-code you can put under version control. Here’s my ansible-based humble homelab project.
Covering ansible in-depth is beyond the scope of this article, but I can highlight some key points:
- There’s a playbook.yml for quickly (re-)configuring my server with one or more services.
- A separate playbook-vagrant.yml exists for re-creating the same setup within a virtual environment on my machine. With this I can quickly load any backups and experiment locally.
- Thanks to Ansible Vault I also put secrets under version control, everything except the vault’s master password.
- I run a separate mailserver which my server(s) utilize.
There are certainly many more details to unpack about my ansible-deployed Humble Homelab project. When exploring how ansible deploys Forgejo, I encourage readers to also familiarize themselves with ansible concepts.
Reflections #
Good on you, for making it all the way to the end of this long article. I’m reminded of the article “NSA-proof your e-mail in 2 hours”, and I think that the concepts of this article will take a bit longer to implement.
To build upon my Humble Homelab project, you would first need to adapt it to your personal tech-ecosystem. Nevertheless, I hope that this article will save you some trouble, if you happen to be inspired to head down a similar path as me. If you do self-host your git projects, send me an email and I’ll add you to a list of related reading and projects on this article.